


How do you go from this to this?
Every year as the kids go back to school I alter a composition book
for me! Notes, journaling, ideas for future projects go in here!


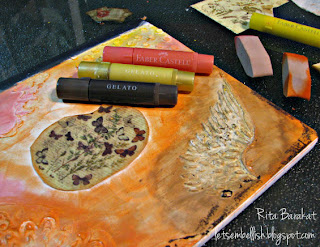
Cover the book with Gesso and then color with your favorite Faber-Castell Design Memory Craft® Gelatos™. The color is soft and easily blended with a dry sponge.


Grab your stencils and some Molding Paste or Gel Medium (heavy), spread the paste onto the stencil like frosting and carefully lift off.
*Clean your stencil right away! Baby wipe or soap and water!
You can use a heat gun to dry or set it aside.

After it was dry I went back and added another coat of Gesso -
this step is NOT necessary; the black was still showing and driving me
crazy so I did it. It was not necessary as the layers would have covered it up eventually;
I wasn't sure where I was going with this so I covered it and added more color.
I included this picture because I wanted to show that you can color right on
top of your dry texture with Gelatos™.
.
Add more paste and more color...
Continue to add color, paper and embellishments
until you are happy with it.

On top of the paste add
You can see it really shines, it was the perfect accent!


I hope this inspires you to alter your own notebook!

Thanks so much Rita, WOW that notebook really did change into something spectacular didn't it!?
Here are some of the main ingredients Rita used:
 |  |  |  |  |  |
 |  |  |  |  |  |
 |  |  |  |  |  |
InLinkz.com
Thanks for reading today, and I hope you enjoyed our Friday Fun posts!

To win today's blog candy- just join our blog following and comment below!
The winner of the Some Odd Girl post on Wednesday is: Irene McBeatle! Please email Steph@SimonSaysStamp.com with your shipping information and the name of the blog you won from! Congrats!
Enjoy your weekend!
-Michelle

Pin It
SUBSCRIBE TO:
This Blog | Our Newsletter
WE'RE SOCIAL:
Facebook | Twitter | YouTube | LinkedIn | Pinterest | Google+
TAKE THE CHALLENGE:
Simon Says Stamp Challenge! | Vintage Simon Says Stamp & Show Challenge
Oh wow the altered book looks gorgeous love the way Rita has used the stencils and molding paste to create the design looks Awesome!!!
ReplyDeleteGorgeous altered composition book! I love altering them, too!!! I will have to try using the molding post on them...thank you for the inspiration and fantastic ideas!
ReplyDeleteVery cool! Love the look of the paste!
ReplyDeleteJill M
VERY cool- stencils and modeling paste and gelatos- what's not to love?!
ReplyDeleteBeautiful. Love how you used the stencil and paint.
ReplyDeleteGorgeous project! Love it!
ReplyDeleteAwesome altered notebook. I love the textures and colors.
ReplyDeleteso pretty!!
ReplyDeleteBeautifully crafted altered book, so amazing. Thanks for sharing!!!
ReplyDeleteThis is just soo absolutely outstanding work. I simply love, what you´ve done with this notebook, it´s awesome.
ReplyDeleteHAve a great week-end everyone and lots of funtoo.
Such a fabulous project, Rita!! :)
ReplyDeleteI need to run out and get modeling paste, I have the gesso covered book and some of those lovely gelatos, I was just waiting for the right idea of what to do with it. I found it here!
ReplyDeleteFabulous work! I love all the colors and textures!
ReplyDeleteWow! That is some transformation! Thanks for sharing with us!
ReplyDeleteThat is crazy cool! Thanks for sharing!
ReplyDeleteLove the look with stencils and paint! Very cool =)
ReplyDeletethose are gorgeous!
ReplyDeleteI love your cover, Beautiful texture and color and great way to use gesso.
ReplyDeleteWhat a creative project, those Gelatos look like fun!
ReplyDeleteSimply amazing work! It's hard to believe it was a composition book. Thanks for sharing how you created the masterpiece.
ReplyDeleteWow, that is so cool. I have been wanting to try out the gelatos.
ReplyDeleteSo pretty! Love the iridescent color :)
ReplyDeleteWhat an amazing transformation - such rich colours and such depth of texture - wow!
ReplyDeleteAlison x
Wow, this is fabulous. Thanks for showing how you did it.
ReplyDeletewow, what a transformation of this notebook
ReplyDeleteGelatos must be very fun to play with!
ReplyDeleteWhat a transformation! This book looks just awesome. Definitely inspired to make one of my own! :)
ReplyDeleteWOW this is GORGEOUS Rita!
ReplyDeleteThanks for the walk through:)
Interesting projects!
ReplyDeleteBeautiful Work...thanks for sharing with us today.
ReplyDeleteWhat a great mixed media cover. I'm sure that any student would love one, too. They'd be the envy of all their friends. Have fun filling it!
ReplyDeleteSuch a beautiful journal cover. Iris
ReplyDeleteReally nice. Love the texture and colors.
ReplyDeleteLinda T
Fabulous! I love all the texture
ReplyDeleteLove all the texture on this book :)
ReplyDeleteReally nice book
ReplyDeletelove the colors and texture
Greetings Janny
WOW! That's awesome! Love the textures and colors!
ReplyDeleteStunning!! Love all the coloring all the details!!
ReplyDeleteSuch a cool idea. TFS
ReplyDeleteWow, what a fabulous notebook!
ReplyDeleteWow! THis looks so cool! I've never worked with gellatos, but it looks awesome!
ReplyDeleteAwesome notebook! I love gelatos. They're so creamy & the colors are so rich. TFS
ReplyDeleteWhat an amazing cover- you'd never know it started as a standard black and white spotty cover!
ReplyDeleteFabulous project and great step outs, Rita! Always enjoy the process!! Thanks for another WONDERFUL inspiration <3
ReplyDeleteWow GREAT alteration! Your comp book looks amazing!
ReplyDeleteWow. Notebook transformed into artwork!
ReplyDeleteWow, totally gorgeous Rita!! I can't believe how many projects I've seen lately with Gelatos and all they can do! This is just another stunning example. TFS!
ReplyDeleteThis is a really beautiful book and so creative.
ReplyDeleteOh wow! I LOVE what was done to this book!!!
ReplyDeleteI always love Rita's designs. I have to get some of that modeling paste. Rita has been showing so many great ways to use it as of late.
ReplyDeleteThis is so fun! I've never heard of many of these products, so it's neat to learn something new!
ReplyDeleteWow this is awesome!
ReplyDeleteCan't believe what the book looked like to start with, Looks fantastic finished :)
ReplyDeleteGorgeous! Great idea:)
ReplyDeleteWonderful! Thanks for sharing this fabulous project with us.
ReplyDeletewhat a great project. It's hard to believe that it started as a plain notebook.
ReplyDeleteGreat project, this is really something I would like to try, although I don't have any gelato's I am sure other things would work for color. Thanks for sharing.
ReplyDeleteKatie B.
fabulous notebook Rita ! I love the whole arty design of this ,,, gorgeous ! :-)
ReplyDeleteluv
Lols x x x
Wow. I´m amazed. This is so cool tutorial and I definitely want to try this technique.
ReplyDeleteSomething that you place becomes your own statement, and surely this is the one that everyone will be following. The magical spray makes the world dance around you, and most importantly, act as the true indicator of your mood. From www.rightshopping.in/Perfumes-deo-india-online.html
ReplyDeleteWow this is really spectacular! I love this look. Thanks for the chance to win!
ReplyDeleteThat is way cool! ...but that means i need to buy more fun stuff to do that technique - oh no what is a girl to do!!!! :)
ReplyDeleteThis is phenomenal. I love all the texture and dimension...and shine! Wow! What did you use for your closure?
ReplyDeleteKathy thank you, I repeated the look on the back, punched a whole in the back cover (on the edge) and on the spine of the book then ran Jute through the holes. The Jute is on the inside of the back cover - the holes line it up and keep it in place to keep the book closed.
DeleteVery artsy! Love the look. Thanks for sharing. :D
ReplyDeletevery very cool
ReplyDeleteOh My! The colors, the textures, the techniques....this is just "WOW"!
ReplyDeleteGreat artistic look of the altered notebook!
ReplyDeleteFun! I wish I'd done this when I was in school but I can do it now!
ReplyDeleteKris in Alaska
funamom at yahoo dot com
That is such a cute way to decorate a book! Thanks for the inspiration!
ReplyDeleteSTUNNING!!!
ReplyDeleteamazing mixed media creation! would love to see more of this!!
someone is going to be VERY happy indeed with that fab notebook! love all of the details. :)
ReplyDeleteShe is so talented and artsy--she just amazes me time and again...
ReplyDeleteHoly smokes...looks like fun!!!
ReplyDelete